The little toolbar that WordPress uses when editing a new post or page is called a WYSIWYG (pronounced “wizzy-wig”), which stands for “What You See Is What You Get.” This is because the WYSIWYG allows you to better visualize what your new post or page will look like while you are making it. Even with the WYSIWYG, what you see isn’t exactly what you will get, but it is far more user-friendly than writing in a text editor. Let’s review each of the buttons on the WYSIWYG (if you’re familiar with word processors, you might recognize several of the buttons already).
Adapted from thinkoomph.com.
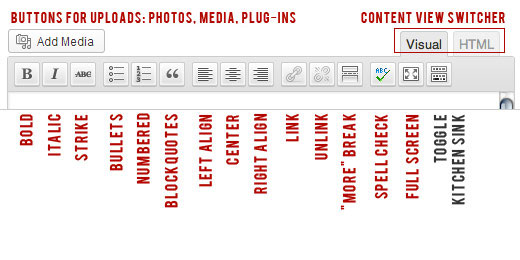
Add Media: Allows you to insert media content (photos, video, etc.). See our other guide to the Add Media process.
Visual vs. HTML: The Visual tab provides you with the WYSIWYG while the HTML tab takes it away. Unless you know how to code HTML, we recommend always making sure you’re on the Visual tab before creating your post or page.
Bold/Strong: When this button is selected, any new text you type or highlight will be bold/strong.
Italic: When this button is selected, any new text you type or highlight will be in italics.
Strikethrough: When this button is selected, any new text you type or highlight will appear with a strike through it.
Bullets: You can create a bulleted list, like this:
- My list
- Is really
- Nice
Numbered: You can created a numbered list, like this:
- Here is the first part
- And the second part
- And the third part
Blockquotes: If you highlight some text and then hit this button, it will create a stylized block quote of the text, such as…
Lorem ipsum dolor sit amet, consectetur adipiscing elit. Maecenas ac ante id nisl pulvinar luctus non ac arcu. Sed lorem leo, elementum eu viverra nec, commodo sit amet ipsum. Proin quis neque risus. Nam consequat placerat massa sit amet aliquam.
Alignments: Left, Center, and Right Align will align your text accordingly.
Link: If you highlight some text and then hit this button, a small window will pop up. You can either link to another website or to some of your existing content (your other posts or pages).
Unlink: If you select some text that you have previously linked and then hit this button, you will remove the link from that text.
“More”: Clicking this button will insert a “more break.” This is usually only used for new posts, as it has your readers click a “Read More” link in order to see any content you have created below the break.
Spellcheck: This button will toggle the spellchecker on and off. When it is on, red underlining will appear beneath words that WordPress thinks are misspelled.
Fullscreen: Also known as “distraction-free writing mode,” clicking this button will remove much of the surrounding WordPress interface, making for a less cluttered screen when writing.
Kitchen Sink: Activates the Kitchen Sink (see below), which provides additional WYSIWYG buttons.
Adapted from thinkoomph.com
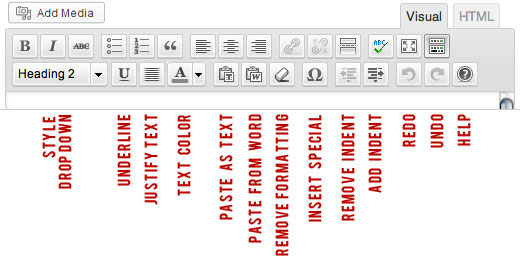
Style Dropdown: This allows you to implement some HTML text styles. Use with caution (especially if you aren’t familiar with HTML), as adding these styles can affect the formatting of your post or page in unexpected ways.
Underline: When this button is selected, any new text you type or highlight will be underlined.
Justify: This is another text alignment option like Left/Center/Right Align, above. It can be tricky to use, so it is advised to avoid it unless you specifically want a justified look.
Text Color: Opens a palette so that you can change the color of your text. Make sure you choose colors that fit with the colors of your overall website!
Paste as Text: Sometimes when you copy and paste text from another website, all the hidden formatting code is copied and pasted with it. This can really mess up the formatting of your own beautiful post or page! If you think this might happen to you, copy the text you want, but hit this button to paste it. It should remove all that naughty outside formatting.
Paste from Word: Much like Paste from Text (above), Paste from Word allows you to get rid of any hidden Word formatting when pasting.
Remove Formatting: If you highlight text and then hit this button, any special formatting should be removed from that text.
Insert Special: Allows you to insert special characters, such as ñ, ≠, ≤, and many more!
Add/Remove Indent: Adds or removes an indent from highlighted text.
Redo/Undo: Undoes the last thing you did or redoes the next thing you had done, but undid! You can keep clicking these to go “back” or “forward” through all the changes you make.
Help: A window pops up that will explain more about the WYSIWYG and what you can do with it.